

Krystle Kemp, designer and enthusiast of all things Make up, Photography, Travel, Family, Life and Adventure.
The Christmas competitions have started: Win an ipad two
Little Chief Honeybee has generously put this brand new 16GB white ipad 2 up for grabs. Entering is easy, and even if you don't want to enter this awesome competition (I don't see why you wouldn't) you should go check out her blog at honeybeeinthecity.blogspot because it's really awesome.

25 Days till Christmas! What's on your Wish list?

So for now, let's be shallow and talk about the present aspect of Christmas! What's on your list?
Here's my wish list for Santa, I'm going all out just for fun, I mean it's called a wish list right? So its allowed to be impractical, over the top and fun.
As I've gone a little photo obsessed, most of the stuff on this list is camera oriented, sorry if it's a bit boring. But I've tried to add some variety!
Swarovski "Holly Starfish pierced earrings"
I really like the idea of getting at least one Christmas present that you don't need at all. A pure 'want' item that you would never splash the money on for yourself. And this year that lavish and unnecessary gift are these little starfish. I have loved these earrings for as long as I can remember. They are so classic, and go with everything. What's not to love?

My mom's mince pies have got to be the best. But at this point I'd settle for store bought ones. Unfortunately in Korea these little gems are hard-to-come-by (if not impossible)! I didn't even get one last year, hopefully this year i'll have more luck, if not though- definitely next year!

A Pooh Polaroid Camera
This is a totally unnecessary want in my life, but all the "cool" bloggers have one! So I want one too! Plus I think its such a nice idea to take special moment snapshots, put a little magnetic tape on the back and stick them to your fridge.

A Second Memory Card for my Camera
This falls under my reasonable and actually needed category. I would love second memory card for my camera, so that when one is full I don't have to go into panic mode deciding which photos to delete and save. Obviously the bigger the better- but any size will do, I'd just like it to be a "class 10."

Again a needed and reasonable want, for those days when one battery just isn't enough juice! I believe i need a LP-E8 (who knew)

I'v used the body shop's Vitamin E cleanser, toner and moisturizer for years, and I'm totally a fan. Alas, all of mine have run out (pretty much at the same time impressively) and I need some more. I'm categorizing this as necessary pampering. I would replace this myself, but as I'm leaving soon baggage weight is weighing heavily on my mind (see what I did there!). So If someone out there back home wants to treat me to this, you can save on postage:P And I'll pick it up in March!

Very helpful for all of those self portrait pictures of me and Charlie Brown. The canon ones are a little pricey but you can pick up a no-name brand for around 6000won on G-market!

Shutter Releases are used with a tripod to prevent hand shake when taking a picture with a very slow shutter speed. Like everything in life these range from affordable to not so affordable, but you can pick one up easily for around 30 000won.

Camera Tripod
Don't say you didn't see this one coming after you read about the shutter release. I'd really like a tripod with a tilt and adjustable head. I'm loving this one from G-market available for only 20 000won.

So there you have it, pretty geeky hu!? If you're one of the 3 people I may be lucky enough to get a gift from this year, please consult with Charlie Brown (A.K.A Chris) so that I don't get the same gift twice:)
Now I've shared- it's your turn! What's on you're list?
30 days of me: Day 15

So, I'll come back to that, but for now I'm putting my I-pod on shuffle and telling you the first 10 songs that play apparently!
 |
| Source: Unknown |
- Carnival Town, Norah Jones from the album "Feels like home"
- Breath Again, Sarah Bareillies, from the album "Kaleidoscope heart" (this has go to be one of my favorite albums of the year.
- Gap, The Kooks, from the album "Konk"
- I Could Say, Lily Allen, from the album "It's Not Me It's You"
- Now I'm Here, Queen, from the album "Greatest hits 1"
- If I Were a Boy, Beyonce, from the album "I am...Sasha Fierce"
- 1985, Bowling for Soup, from the album "A Hangover You Don't Deserve" (It's impossible not to sing along to this song!)
- Girl I Wanna Lay You Down, Jack Johnson
- 7/4 (Shoreline), Broken Social Scene, from the album "Broken Social Scene"
- I Know, Fiona Apple, from the album "When The Pawn"
There you have it, had more fun making this list than I thought I would, brought back some good 'ol memories. If you give it a go let me know:)
Mulberry handbag giveaway from The Flower Girl
Check out this awesome Mulberry handbag giveaway from The Flower Girl! How stunning is this bag?! Just click on the link, follow four super easy steps and you stand a chance to win.


My first studio photo shoot!
This post is way to long, I've posted way to many pictures, but I've cut them down to 10 (ok, maybe 11) from over 1000, and it was hard to chose (not because they were all brilliant or anything, but after a while they all start to look the same.) Give a girl a break! Let me know what you think? To see more photo's from the same shoot go here.


To find out more about the course go here, and to find out more about how to recreate this effect on your own pictures, go here.


To find out more about the course go here, and to find out more about how to recreate this effect on your own pictures, go here.
Action source credit: davidnanchin
25 ways to wear a scarf this winter
With winter well on its way I've been meaning to make a post about different ways to wear a scarf. I hadn't quite gotten around to it when my friend posted this awesome you tube video up on Facebook! I must say, I thought it was really helpful, so I hope you enjoy it as much as I do.
The attraction of Photo Shop "actions": How to install and use a downloaded action

Ultimately an action is a recording of the steps you may have taken, or copied from someone else, while editing a photograph. You can then save that recording and play it over and over again on multiple pictures to get the same style effect.
In this post I'm going to be focusing on how to instal a downloaded action, and apply it to a picture.
Start of by finding an action to download. Deviant Art is always a good place to start, or alternatively just google search "free photoshop actions." I went the google route for this tutorial and found this site here, which offers 100 cool actions for free download.
Chose the action you want, click on it and press download.

Ok, so here is the action I chose from the above mentioned website. Click on the link to open the file.
 This should open a page that looks somthing like this. In the top right of the page click "download file. Once the file is downloaded, open photoshop and chose an image you would like the action to be applied to.
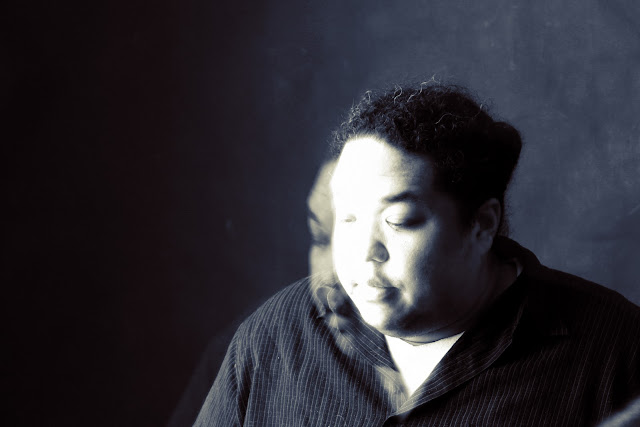
This is the image that I chose
 I go to the actions pallet on the right of the screen. If you can't find it go to >window>actions, click on "actions" and a pallet should appear. Or click on the play button which you can see here in the very right of the image, and it will extend the pallet.
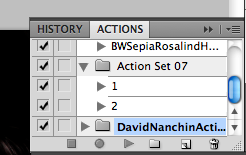
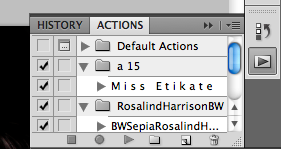
You should now be able to see a file, with the name of the action you downloaded, in your actions menu. Click on the right pointing triangle to extend it so that you can see what's inside the file.
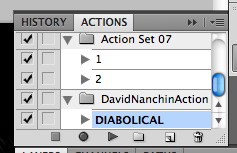
The action I want to use is called "Diabolical" so I select it, and then click the "play arrow" located just below it. It will probably take a few seconds to apply, but soon the image on your screen will have changed to something that looks a little more like this.

So thats it, if you get a little lost along the way, don't hesitate to leave me a comment or send me an email:)
Action source credit: davidnanchin
A Glitzy Trio

It's super quick and easy to do!
Here's what you'll need:

- A light base coat
- 3 different colours of nail varnish varying in shade from light to dark
- A glittery nail varnish
- A small sponge
- A piece of tinfoil or plastic

- Apply the light base coat and wait for it to dry
- Paint three lines of different colour onto the piece of plastic or tinfoil, (make sure that the colours increase from light to dark)
- Dab a sponge onto the painted lines on the plastic
- Carefully roll the sponge across your finger nail
- Paint over the lines on the tinfoil, dab with a sponge and repeat on your next nail.
- Once all nails are completed, paint over them with a glittery nail varnish to blend the colours more and finish the look.
- Once you're finished clean around the edge of your fingers where there may be some excess paint, ( an earbud coated in nail varnish remover should do the trick!)
And voila! You're finished

Awesome iMo camera strap give-away from Miss Indie
 |
| Source: iMo camera fashion |
Miss Indie is giving away an awesome iMo camera strap this week. If you're interested in entering the competition go here :) It's as easy as 1,2,3!
 | |
|
30 Days of me: Day 12

I've been revoltingly busy at work at the moment, and my poor little blog has been neglected, so I'm a little behind with the 30 day challenge, but never mind, hopefully next week will be a little quieter.
Moving along, todays challenge is to write about how I found out about blogger and why I chose to make my own blog.
Well it all started at the beginning of this year when I took an Internet and Web design course through Unisa. Our final assignment was to create our own website, which I did, you can go have a peak at it if you like, The Binki Box. The Binki Box is basically my personal online graphic design portfolio where I showcase some of my work. When the course finished I found myself really missing working on my online identity and keeping myself busy. I had heard of the blogging world several years before while studying journalism and thought "hey, why not give it a try!"
I have quite a lot of spare time on my hands at work, in-between classes, and blogging has kept me out of mischief and leaves me feeling more like I've accomplished something at the end of the day.
It's such a great way to meet new people, share with others, learn, showcase my photography and touch up on my writing skills.
So there you have it, the story behind why I decided to make my own blog. As for how I found out about blogger, I google searched something along the lines of "how to make your own blog" and blogger was the first thing that caught my eye.
Back to basics! ISO, Aperture and Shutter Speed
A while ago I told you about a photography course I had signed up for, (if you missed the post you can go and read about it here) the course started this past Sunday and I thought I'd give you a brief overview of some of the things I learnt. Hopefully in writing this we can learn together, and it will clarify and cement some of the things I learnt in 6 hours of information overload!
Ok so here's a rough overview of some theory.
Amongst a whole bunch of other stuff, taking a photo is about finding a balance between three things, ISO, Aperture and Shutter speed, the relationship between these three things and how they work is called exposure. Any change in one of the above three elements will have a specific effect to how the two unchanged elements are affected in creating the photograph.
What are ISO, Aperture and Shutter speed you ask? Well this is my understanding of them...
ISO: Basically the ISO is how light sensitive the camera is. The higher the ISO number, the more sensitive the image sensor in your digital camera is, or the more sensitive your film is to light in a film camera.
In professional studio shoots where a room is full of light, you can use a low ISO of 100, the lower your ISO is the better quality your film will be.Where as in a low light situation, for example an indoors sport event, where you want to capture someone in action, increase you ISO to about 800 (or more), doing this will also increase your shutter speed ability so you can capture clear movement.
Tip: In situations where you can't use a flash like a museum, concert or church, increase your ISO.
*It's important to take note that the higher your ISO is, the more susceptible the photograph is to looking grainy.
Aperture: Aperture can be slightly confusing at times, so bear with me for a moment. To put it simply, aperture is how wide the hole at the back of your lens opens to let light in. Aperture is measured in f-stops. An f-stop of say, 1.4 will let a huge amount of light in (the hole will be as big as it can possibly go) where as an F-stop of 22 will let a small amount of light in as the hole at the back of the lens is about as big as a pin hole.
The smaller the f-number (for example f-2), the larger the diameter of the hole, and therefore the shallower the depth of field. Small f-numbers are great for close-up profile pictures, because only the face will be in focus, everything outside of the face will be out of focus, which creates a really great effect.
The higher the f-number( say f-22), the smaller the diameter of the opening and the greater the depth of field. High f-numbers are great when you're trying to take a landscape photograph and you want everything to be in focus, not just one aspect of the picture.
*So here's the part that gets a bit confusing a small f-number of say f-2 is called a LARGE aperture, where a large f-number of say f-22 is called a SMALL aperture. I guess that it's logical to think that a lower number would be called small, and a higher number would be called large, but because the hole at the back of the lens is its widest when the f-number is its lowest we call small f-numbers large apertures.
Shutter speed: This term is pretty self explanatory. Shutter speed is the speed of the shutter on your camera. Shutter speed is measured in fractions of a second, and measures the amount of time the shutter is open for, each time you take a photograph.
Shutter speed can change the way that movement appears on a camera. Extremely fast/short shutter-speeds can freeze fast moving subjects, for example a propeller on a helicopter making it look like the helicopter is floating in the air (making it look unnaturally frozen). Alternatively slow/short shutter speeds can be used to intentionally create a blur in the picture, this way the propeller on the helicopter will not be clear and frozen in time, but rather blurry, indicating that the helicopter is moving.
The slower the shutter speed is the easier it is to create unwanted movement with hand shake, if your shutter speed is very low, use a tripod or stable foundation to prevent unwanted blur.
Tip: For anything slower than 1/60th of a second use a tripod to prevent hand shake
So there you have it, some basic theory on exposure, I hope this all made sense and wasn't too confusing. Like I said I'm just starting out myself, but if there's anything you're confused about send me an email to thebinkibox@gmail.com or leave me a comment and I'll do my best to help.
Ok so here's a rough overview of some theory.
Amongst a whole bunch of other stuff, taking a photo is about finding a balance between three things, ISO, Aperture and Shutter speed, the relationship between these three things and how they work is called exposure. Any change in one of the above three elements will have a specific effect to how the two unchanged elements are affected in creating the photograph.
 |
| The exposure triangle; a balance between ISO, aperture and shutter speed. Source: http://www.exposureguide.com/exposure.htm |
ISO: Basically the ISO is how light sensitive the camera is. The higher the ISO number, the more sensitive the image sensor in your digital camera is, or the more sensitive your film is to light in a film camera.
In professional studio shoots where a room is full of light, you can use a low ISO of 100, the lower your ISO is the better quality your film will be.Where as in a low light situation, for example an indoors sport event, where you want to capture someone in action, increase you ISO to about 800 (or more), doing this will also increase your shutter speed ability so you can capture clear movement.
Tip: In situations where you can't use a flash like a museum, concert or church, increase your ISO.
*It's important to take note that the higher your ISO is, the more susceptible the photograph is to looking grainy.
 |
| ISO comparison; notice how the image in the top left of the frame with an ISO of 100 is a lot sharper and clearer than the image in the bottom right frame with an ISO of 3200. For a magnified look go here. Image source:http://consumerelectronicsnet.com |
The smaller the f-number (for example f-2), the larger the diameter of the hole, and therefore the shallower the depth of field. Small f-numbers are great for close-up profile pictures, because only the face will be in focus, everything outside of the face will be out of focus, which creates a really great effect.
The higher the f-number( say f-22), the smaller the diameter of the opening and the greater the depth of field. High f-numbers are great when you're trying to take a landscape photograph and you want everything to be in focus, not just one aspect of the picture.
*So here's the part that gets a bit confusing a small f-number of say f-2 is called a LARGE aperture, where a large f-number of say f-22 is called a SMALL aperture. I guess that it's logical to think that a lower number would be called small, and a higher number would be called large, but because the hole at the back of the lens is its widest when the f-number is its lowest we call small f-numbers large apertures.
 |
| The first picture was taken using a large aperture, hence the narrow depth of field, resulting in only the daisy being in focus. In the second picture a smaller aperture is used, increasing the depth of field and increasing the amount in focus in the picture. Source: http://www.photographyreal.com |
Shutter speed: This term is pretty self explanatory. Shutter speed is the speed of the shutter on your camera. Shutter speed is measured in fractions of a second, and measures the amount of time the shutter is open for, each time you take a photograph.
Shutter speed can change the way that movement appears on a camera. Extremely fast/short shutter-speeds can freeze fast moving subjects, for example a propeller on a helicopter making it look like the helicopter is floating in the air (making it look unnaturally frozen). Alternatively slow/short shutter speeds can be used to intentionally create a blur in the picture, this way the propeller on the helicopter will not be clear and frozen in time, but rather blurry, indicating that the helicopter is moving.
The slower the shutter speed is the easier it is to create unwanted movement with hand shake, if your shutter speed is very low, use a tripod or stable foundation to prevent unwanted blur.
Tip: For anything slower than 1/60th of a second use a tripod to prevent hand shake
 |
| The picture on the right is using a fast shutter speed, so we see a sort of frozen snapshot of the water. The picture on the right was taken with a much slower shutter speed and indicates the movement of the flowing water. Source: http://shabbyblogsblog.blogspot.com |
Where to find a ghd hair straightener in South Korea
Looking to buy a ghd in Korea but can't seem to find one anywhere? Well look no further!
I too found myself puzzled and confused by not being able to find a ghd anywhere in Korea when ghds are in fact made in Korea, and well because the majority of korean woman are obsessed with their hair, so why wouldn't they have the worlds best hair straightener (in my humble personal opinion) available in their country? Well, after a few hours of research I have come to the conclusion that you can't find ghds here because they are made by the same company that sells an almost identical product called B2Y, and B2Y's are cheeper!

The B2Y products come in a variety of different sizes and designs which you can check out on their website, b2y Mall, or you can buy them online through Gmarket.

30 days of me: Day 11

Todays challenge is to post another picture of me with a friend. Chris (now on referred to as Charlie Brown) is my friend, fiance, superhero, everything. I'd be lost without him. xox

Make your own Peppero's!

A peppero is a chocolate (and sometimes nut) covered bread stick. If you were to put one peppero flat on a table it would look like a number 1. If you placed two side-by-side they would look like the number 11. Keeping this in mind, Lotte, a huge company in Korea came up with the most ingenious marketing idea ever, to dub the 11th of the 11th "national peppero day" in Korea. So basically everyone goes around buying peppero's for people they like. As today is the 11th of the 11th of 2011 peppero day is even more popular than normal.
As a teacher- I've gotta say I cashed in big today when it came to receiving these chocolate covered treats. But in anticipation of this happening I decided to make my own pepperos to give to my students, fellow teachers and friends.

Bread sticks/ pretzel sticks
Chocolate chips ( or a slab of chocolate)
Some 100's and 1000's, crushed nuts, coconut or anything else you feel like decorating and adding flavor to your stick with
Some plastic sleves
Ribbon or other stationary to decorate your package with
How to do it:
- Start off by melting the chocolate chips. To do this I suggest bringing half a pot of water to boil, placing a bowl on top of the pot (make sure that the bowl isn't plastic so that it wont melt), then putting the chocolate chips into the bowl and turning the heat down on the stove as low as it can go. I use this method so that the chocolate doesn't burn.
- Get your bread/pretzel stick and dip it in the chocolate, if you're struggling to cover the stick in chocolate, scoop some chocolate onto a spoon and run the stick across the spoon while turning it to make sure the stick is covered all around.
- While the chocolate on the stick is still wet dip the stick into shaved coconut or nuts or 100's and 1000's (or just leave plain) and then leave to dry.
- Once you're finished with one colour of chocolate rinse the dish on the pot and start again.
- When you have enough sticks, place them inside plastic packets and decorate to your hearts content.

It's a cute and fun do it yourself activity, doesn't cost too much and can be decorated to suit any occasion really (so maybe keep this in mind for christmas).

Subscribe to:
Posts (Atom)